 Bevel Add ( Drawing Editor )
Tool summary :
Also see :
- Drawing Editor (where Bevel Add is a tool)
- Bevel symbols (topic)
- Bevel Symbol window (opened with Bevel Add )
- Bevel symbol base dimension (setup for Bevel Add )
- Show bevel angle degrees (setup for Bevel Add )
- Bevel symbol exact points (defined with Bevel Add )
- Layer Panel (sets default layer for adding bevel to)
Quick instructions (also see the detailed instructions ) :
|
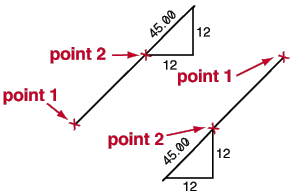
1 . Left-click ( Locate ) to place the tip of the bevel symbol's tail. |
|
2 . Left-click ( Locate ) where you want the bevel symbol. |
|
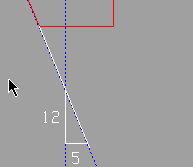
3 . Bevel Add calculates the angle, rise and run from the located points. |
|
4 . Bevel Add draws the bevel symbol. You can now middle-click ( Repeat ) to place a duplicate bevel symbol. Or left-click ( Locate ) to place another bevel symbol. Or right-click ( Return ) if you are done. |
Detailed instructions (also see the quick instructions ) :
The following instructions assume that you are using a 3-button mouse.
1 . Before using this tool:
1a (optional) : On the Layer Panel, select the layer that you want to add the bevel symbol to. This step is optional because you can change the drawing layer in step 5.
1b (if applicable) : Unshorten a drawing that has been shortened to ensure that the angle of the bevel is measured correctly. This also enables Detail Members to correctly preserve ' User-created ' annotations. For best accuracy in any type of Drawing Editor drawing, you can count on measurement tools such as Dimension Add or Ruler or Construction Line Add using BSCL to reliably produce precise and consistent results in an unshortened drawing.
1c (optional) : Set Home > Project Settings > Fabricator > Detailing Symbol Settings > " Bevel symbol base dimension " and " Show bevel angle degrees ." These options apply whether you set them before or after you Add the bevel symbol.
1d (optional) : To set the defaults for the to-be-added bevel symbol(s) to be those of an existing bevel symbol, double-click the existing bevel symbol then press " OK " on its edit window.
2 . Invoke Bevel Add using one (1) of the following methods:
▸ Click the Bevel Add icon. The icon can be taken from the group named ' Objects -- Arcs ' and placed on the ribbon.
▸ Bevel Add can also be invoked using a keyboard shortcut , the context menu , or a mode . For the ' Lightning ' layout style, configuration of the interface is done using Customize Interface .
▸ With Bevel Mode mouse bindings active, middle-click ( Add ).
3 . Locate - Repeat - Return mouse bindings become active along with various Locate options.
|
|
|
bindings |
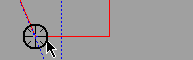
Alternative 1 : Select the Locate icon that you want (if it's not pressed already). Place the mouse pointer (
) so that the point location target (
) snaps to where you want the tip of the bevel symbol's tail, then left-click ( Locate ).
Alternative 2 : Right-click ( Return ) if you do not want to add any more bevel symbols. Do not continue.
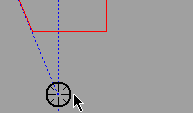
4 . The status line prompts, " Locate second point ." Locate- Pan -Return mouse bindings become active.
|
|
|
bindings |
4a : Place your mouse pointer (
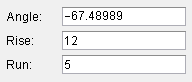
5 . The Bevel Symbol window opens.
Alternative 1 : Make appropriate entries to " Angle ," " Rise ," " Run ," " Tails shown " and " Character height ," then press the " OK " button at the bottom of the window and go to step 6.
Alternative 2 : Press the " Cancel " button to end the Bevel Add operation without adding this bevel symbol. Do not continue.
6 . The bevel symbol is drawn on your computer screen. Locate - Repeat - Return mouse bindings become active. Do one (1) of the following:
|
|
|
bindings |
Alternative 1 : To place another bevel symbol that is not a duplicate of the one you just added, follow these instructions beginning with step 3.
Alternative 2 : Middle-click ( Repeat ) to cause an exact duplicate of the bevel symbol to be drawn from whatever location the point location target (
Alternative 3 : Right-click ( Return ) if you are done adding bevel symbols. Go to step 7.
7 . The mouse bindings that were active when you invoked Bevel Add become active again.
Note: Any bevel symbols added using this procedure can be instantly removed (one at a time, in reverse-order of their addition) by using Undo .

